Tag: SCCM

All things related to SCCM

  • Windows 11 and Multi app kiosks

    Windows 11 and Multi app kiosks

    Lets be clear. There are easier ways of doing this but I am not looking for a cut corners solution. I have made a multi app based kiosk with powershell scripts as Windows 11 and multi app kiosks are not really thought through.

    Win11 leaves too much wiggle room for kioskuser so I make the assigned access by hand. And oh boy what problems does this make…

    So in short I make a kiosk that has basics in place. Lets say browsers, Nomacs – Image Lounge, shutdown and explorer.

    Setup is quite basic. So last month Microsoft did something to Windows 11 and when running this idea of kiosks then you’ll lose ability to see desktop after 2024-10-cumulative update. Have not seen why this is but… It is what it is.

    So now you have to make your own task bar icons so you have start menu and task bar to allow your kioskuser to fuction well. I would rather had desktop but M$ doesn’t agree.

    Limiting Win11 kiosk experience

    So now we have a bases setup for you if you’d choose this way. There is much uncertainty based on this so I wouldn’t recommend this unless you wanted more security.

    Create an Assigned Access configuration file | Microsoft Learn

    So my idea is to use xml and have kioskuser0 be added to guest group. This will strict down access quite a bit and user will only allowed to use locally installed application – no UWP apps available.

    So all needs to be setup in xml that then is imported to powershell and I use app install to use it in Intune. Powershell has scheduled tasks so there will be nothing left after the session is booted. All downloads will be removed, on log in and shutdown.

    
    # Specify the username of the user you want to add to the Guests group
    $username = "KioskUser0"
    
    # Check if the user exists
    $user = Get-LocalUser -Name $username -ErrorAction SilentlyContinue
    if ($user) {
        # Check if the Guests group exists
        if (Get-LocalGroup -SID "S-1-5-32-546" -ErrorAction SilentlyContinue) {
            Add-LocalGroupMember -SID "S-1-5-32-546" -Member $username
            Write-Host "User '$username' successfully added to the 'Guests' group."
            Write-Host "Password for '$username' set to never expire."
        } else {
            Write-Host "Error: The 'Guests' group does not exist."
        }
    } else {
        Write-Host "Error: User '$username' does not exist."
    }
    # Set password to never expire
    $user | Set-LocalUser -PasswordNeverExpires $true

    So for me this is a key feature on this. You really do need to do this when using Win11. Well this i my opinion of course.

    I don’t want to bore you with massive texts so lets put the key piece in here to emphasize what assigned was in this example:

            <AllowedApps> 
              <App AppUserModelId="windows.immersivecontrolpanel_cw5n1h2txyewy!microsoft.windows.immersivecontrolpanel" />
    	      <App AppUserModelId="Microsoft.WindowsNotepad_8wekyb3d8bbwe!App" />
    		  <App AppUserModelId="Microsoft.Windows.Explorer!App" />
              <App DesktopAppPath="%windir%\explorer.exe" />
              <App DesktopAppPath="%ProgramFiles(x86)%\Microsoft\Edge\Application\msedge.exe" />
              <App DesktopAppPath="%Programfiles%\Adobe\Acrobat DC\Acrobat\Acrobat.exe" />
              <App DesktopAppPath="%Programfiles%\Google\Chrome\Application\chrome.exe" />
    		  <App DesktopAppPath="%windir%\system32\shutdown.exe" />
              <App DesktopAppPath="%windir%\system32\Notepad.exe" />
              <App DesktopAppPath="%Programfiles%\nomacs - Image Lounge\bin\nomacs.exe" />
            </AllowedApps> 
          </AllAppsList> 
            <v2:FileExplorerNamespaceRestrictions>
            <v2:AllowedNamespace Name="Downloads"/>
            <v3:AllowRemovableDrives/>
          </v2:FileExplorerNamespaceRestrictions>
          <win11:StartPins>
            <![CDATA[{
              "pinnedList":[
                {"desktopAppLink": "%ALLUSERSPROFILE%\\Microsoft\\Windows\\Start Menu\\Programs\\Kiosk\\Notepad.lnk"},
                {"desktopAppLink": "%ALLUSERSPROFILE%\\Microsoft\\Windows\\Start Menu\\Programs\\nomacs - Image Lounge.lnk"},
    			{"desktopAppLink": "%ALLUSERSPROFILE%\\Microsoft\\Windows\\Start Menu\\Programs\\Adobe Acrobat.lnk"},
                {"desktopAppLink": "%ALLUSERSPROFILE%\\Microsoft\\Windows\\Start Menu\\Programs\\Microsoft Edge.lnk"},
                {"desktopAppLink": "%ALLUSERSPROFILE%\\Microsoft\\Windows\\Start Menu\\Programs\\Firefox.lnk"},
                {"desktopAppLink": "%ALLUSERSPROFILE%\\Microsoft\\Windows\\Start Menu\\Programs\\Google Chrome.lnk"}    
    			{"desktopAppLink": "%ALLUSERSPROFILE%\\Microsoft\\Windows\\Start Menu\\Programs\\Kiosk\\sulje istunto.lnk"}  
    			{"desktopAppLink": "%ALLUSERSPROFILE%\\Microsoft\\Windows\\Start Menu\\Programs\\Kiosk\\File Explorer.lnk"}  
              ]
            }]]>
          </win11:StartPins>
          <Taskbar ShowTaskbar="true"/>
          <win11:TaskbarLayout>
      <![CDATA[
        <LayoutModificationTemplate 
        xmlns:defaultlayout="http://schemas.microsoft.com/Start/2014/FullDefaultLayout" 
        xmlns:start="http://schemas.microsoft.com/Start/2014/StartLayout" 
        xmlns:taskbar="http://schemas.microsoft.com/Start/2014/TaskbarLayout" 
        Version="1" xmlns="http://schemas.microsoft.com/Start/2014/LayoutModification">
          <CustomTaskbarLayoutCollection PinListPlacement="Replace">
            <defaultlayout:TaskbarLayout>
              <taskbar:TaskbarPinList>
                <taskbar:DesktopApp DesktopApplicationLinkPath="%ALLUSERSPROFILE%\Microsoft\Windows\Start Menu\Programs\Microsoft Edge.lnk"/>
    			<taskbar:DesktopApp DesktopApplicationLinkPath="%ALLUSERSPROFILE%\Microsoft\Windows\Start Menu\Programs\Google Chrome.lnk"/>
    			<taskbar:DesktopApp DesktopApplicationLinkPath="%ALLUSERSPROFILE%\Microsoft\Windows\Start Menu\Programs\Firefox.lnk"/>
    			<taskbar:DesktopApp DesktopApplicationLinkPath="%ALLUSERSPROFILE%\Microsoft\Windows\Start Menu\Programs\Kiosk\Notepad.lnk"/>
    			<taskbar:DesktopApp DesktopApplicationLinkPath="%ALLUSERSPROFILE%\Microsoft\Windows\Start Menu\Programs\nomacs - Image Lounge.lnk"/>
    			<taskbar:DesktopApp DesktopApplicationLinkPath="%ALLUSERSPROFILE%\Microsoft\Windows\Start Menu\Programs\Adobe Acrobat.lnk"/>
    			<taskbar:DesktopApp DesktopApplicationLinkPath="%ALLUSERSPROFILE%\Microsoft\Windows\Start Menu\Programs\Kiosk\sulje istunto.lnk"/>
    			<taskbar:DesktopApp DesktopApplicationLinkPath="%ALLUSERSPROFILE%\Microsoft\Windows\Start Menu\Programs\Kiosk\File Explorer.lnk"/>
              </taskbar:TaskbarPinList>
            </defaultlayout:TaskbarLayout>
          </CustomTaskbarLayoutCollection>
        </LayoutModificationTemplate>

    This is NOT the whole assigned access. This is only an example that has the required parts. So please don’t use this as “whole xml” since its not. You need to put your own layout but might use this as an example.

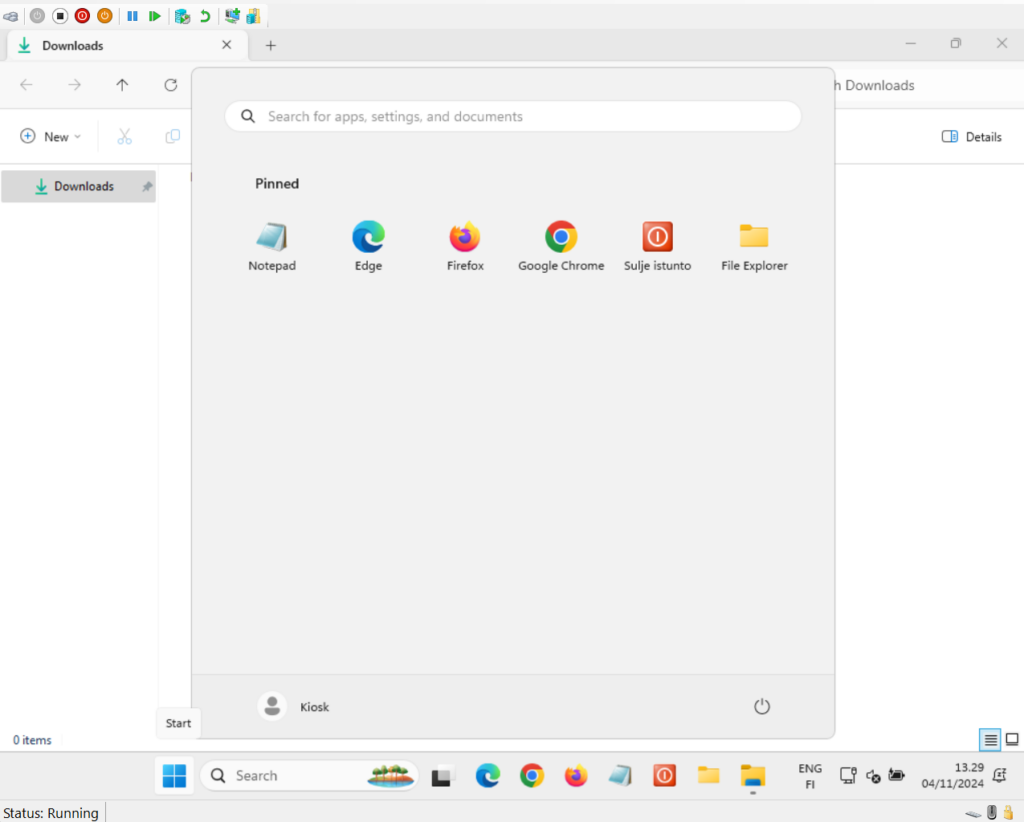
    How Windows 11 kiosk looks

    Virtual machine will get desktop so bare this in mind. As this is a virtual machine, it will actually see the public desktop icons. This is why there is a full screen explorer open, so you will not have false sense of hope that you can use desktopicons with Win11 kiosk. This is not something you will experience with proper computer:

    There will be the option to use removeable drives but with VM being the test subject there is none available. It works tho.

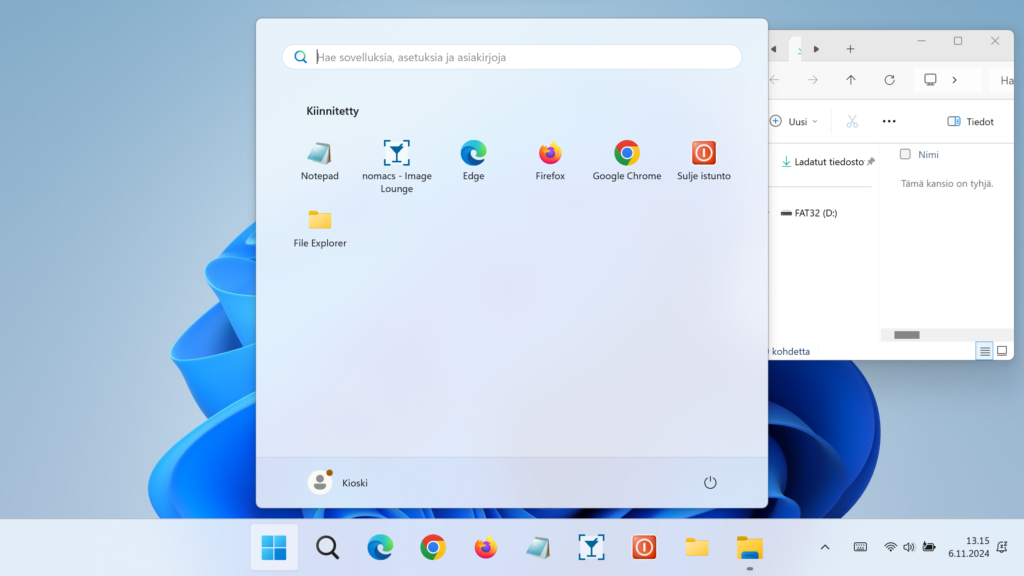
    Updated: This is an example of a real computer screen. Finnish OS that has been built with Windows 11 kiosk with limited access to only Downloads and removable drives. All the icons that should be in users desktop are gone. There are all icons in available in the public desktop, but kioskuser0 will not see these after last CU update and running the autopilot after these updates.

  • Install SCCM application using base variable

    Install SCCM application using base variable

    The dynamic part of this is really simple and can be made into really complex installation sequences. Here I will only showcase the simplest of ways to use it.

    So we are talking about installation that uses base variable. This an be used in many ways

    You can write them with powershell to your computer as you go. Meaning that you have some kind of SQL query to search something and based on results you write them into variables to that computer being installed. Or query AD group based variables of premade computer account or what ever. Its not really limited on ways how to use it.

    So lets play with the idea for a sec.

    So here we have a multiple collection that have a variable placed upon the collection. If your computer is a member of this group then it will get the app01 variable that guides installation to

    With app variable you need to have the variables placed in a right order. So if you have app01 and app03 being deployed, you will only install app01. You have to play around the problem by re-writing the computer variables so you will get app01 and app02. There are examples of this in the internet.

    For example David O’Brian wrote this post about the matter, please check it out:
    ConfigMgr – Application Base variables the easy way with Powershell – Cloud for the win!

    Behind the link you may have an example script on how to rename variables.

    Based upon David O’Brian’s script there is a variable named APP used in the example script. And It uses App_Variables.log filename to log events.

    
    if ($args.Count -eq 1)
        {
            $BaseVariableName = $args[0]
        }
    elseif ($args.Count -eq 2)
        {
            $BaseVariableName = $args[0]
            $LengthSuffix = $args[1]
            
        }
    
    Function Write-Message(
    	[parameter(Mandatory=$true)]
    	[ValidateSet("Info", "Warning", "Error", "Verbose")]
    	[String] $Severity,
    	[parameter(Mandatory=$true)]
    	[String] $Message
    )
    {   
        if((Test-Path -Path  $LogFile))
            {
        	    Add-Content -Path "$($LogFile)" -Value "$(([System.DateTime]::Now).ToString()) $Severity - $Message"
            }
        else
            {
                New-Item -Path $LogFile -ItemType File
            }
        Switch ($Severity)
            {
        	    "Info"		{$FColor="gray"}
        	    "Warning"	{$FColor="yellow"}
        	    "Error"		{$FColor="red"}
        	    "Verbose"	{$FColor="green"}
        	    Default		{$FColor="gray"}
            }
        Write-Output "$(([System.DateTime]::Now).ToString()) $Severity - $Message" -fore $FColor
    }
    
    $BaseVariableList = @()
    $BaseVariableName = "App"
    $LengthSuffix = 2
    
    
    $objSMSTS = New-Object -ComObject Microsoft.SMS.TSEnvironment
    
    $SMSTSVars = $objSMSTS.GetVariables()
    
    $SMSTSLogPath = $objSMSTS.Value("_SMSTSLogPath")
    
    if (Test-Path $SMSTSLogPath)
        {
            $LogFile = $(Join-Path $SMSTSLogPath Apps_variables.log)
        }
    
    #Writing the Variables to Logfile
    Write-Message -Severity Info -Message "This is the Dynamic Variable List BEFORE rebuilding it."
    
    foreach ($Var in $objSMSTS.GetVariables())
        {
            if ( $Var.ToUpper().Substring(0,$var.Length-$LengthSuffix) -eq $BaseVariableName)
                {
                    Write-Message -Severity Info -Message "$($Var) = $($objSMSTS.Value($Var))"
                    $BaseVariableList += @{$Var=$objSMSTS.Value($Var)}
                }
        }
    
    $objects = @()   
    $fixed = @()
    $objects = $BaseVariableList
    
    [int]$x = 1
    # Writing the variables to Logfile after being reordered
    Write-Message -Severity Info -Message "------------------------------------------------------"
    Write-Message -Severity Info -Message ""
    Write-Message -Severity Info -Message "This is the Dynamic Variable List AFTER rebuilding it."
    
    foreach ($i in $objects) 
    { 
        $Name = "$($BaseVariableName){0:00}" -f $x
        $Value = "$($i.Values)"
        $fixed += @{$Name=$Value}
    
        Write-Message -Severity Info -Message "$($Name) = $($Value)"
    
        $x++
        $Name = ""
        $Value = ""
        
    }
    
    $BaseVariableListFixed = @()
    $BaseVariableListFixed += $fixed


    foreach ($BaseVariable in $BaseVariableListFixed)
        {
            
            ""
            $objSMSTS.Value("$($BaseVariable.Keys)") = "$($BaseVariable.Values)"
        }
    

    The idea of the script is still the same. You need to have a prefix on what to search and re-write the numbers as shown in the picture.

    This also can be done to computers already installed. Meaning that you can run task sequence over and over again but hide progress bar for it. This means you can have your AD groups that guide your application installation. Running all AD groups against their variables will automatically detect correctly installed apps and re-apply missing ones or add the new ones. Please do not use this. This is not really clever way to use this. Its just an example.

    I am quite sure there are ton of ways I have missed the “how you might use these”. But the idea of how and why you might want to add these to your repertoire could be in those example scenarios. Or better yet have your own idea what suits you and your own environment.

    If variable app name does not exists it does make an error in smsts.log:

    Application policy for ‘WrongAppNameHere‘ not received. Make sure the application is marked for dynamic app install. Policy download failed, hr=0x80004005.

    So its not really unknown app. Variable is clearly written in smsts.log. And smsts.log will be your friend on debugging problems.

    If I’d do my this on my own environment I’d probably would go for premade computer accounts with AD group based install. This can also be made so you copy the ad groups from an example computer. You could do this by running query against the old computer and create the computer account with the same ad groups. It would be quite an easy function to build and should be easily maintained.

  • Very simple powershell how to manually add computer to SCCM

    Very simple powershell how to manually add computer to SCCM

    I must say apologizes to Guy, he contacted me and it took me over a month to reply. He asked me if I could fix my site. I couldn’t but now I have re-write the content. This once again is a great reminder on the importance of getting backups.

    Rant over and topic at hand. There is a simple way to make a powershell script to add computer to your SCCM database.

    $SiteCode = "DEV" 
    $ProviderMachineName = "sccm.de.mo"
    $initParams = @{}
    
    if((Get-Module ConfigurationManager) -eq $null) {
        Import-Module "$($ENV:SMS_ADMIN_UI_PATH)\..\ConfigurationManager.psd1" @initParams 
    }
    if((Get-PSDrive -Name $SiteCode -PSProvider CMSite -ErrorAction SilentlyContinue) -eq $null) {
        New-PSDrive -Name $SiteCode -PSProvider CMSite -Root $ProviderMachineName @initParams
    }
    Set-Location "$($SiteCode):\" @initParams
    $MAC = Read-Host -Prompt 'Input Computer MAC address'
    $CpuName = Read-Host -Prompt 'Input Computername'
    Set-Location "$($SiteCode):\" @initParams
    Import-CMComputerInformation -CollectionName "All Systems" -ComputerName "$CpuName" -MacAddress $mac
    Write-Host "Added $Added Computers, skipped $Skipped"
    get-date -Format "HH:mm:ss dd.MM.yyyy"
    

    Last time I think i had this. This connects to SCCM and prompts Computer name and MAC.

    If you’d need more than a single import then you could use this:

    $SiteCode = "DEV"
    $ProviderMachineName = "sccm.de.mo"
    $initParams = @{}
    
    if ((Get-Module ConfigurationManager) -eq $null) {
        Import-Module "$($ENV:SMS_ADMIN_UI_PATH)\..\ConfigurationManager.psd1" @initParams
    }
    
    if ((Get-PSDrive -Name $SiteCode -PSProvider CMSite -ErrorAction SilentlyContinue) -eq $null) {
        New-PSDrive -Name $SiteCode -PSProvider CMSite -Root $ProviderMachineName @initParams
    }
    
    Set-Location "$($SiteCode):\" @initParams
    $Added = 0
    $Skipped = 0
    
    while ($true) {
        $MAC = Read-Host -Prompt 'Input Computer MAC address (leave blank to stop)'
        $CpuName = Read-Host -Prompt 'Input Computer name (leave blank to stop)'
        if ([string]::IsNullOrWhiteSpace($MAC) -or [string]::IsNullOrWhiteSpace($CpuName)) {
            Write-Host "Ending import as one of the inputs was blank."
            break
        }
        try {
            Import-CMComputerInformation -CollectionName "All Systems" -ComputerName "$CpuName" -MacAddress $MAC
            $Added++
            Write-Host "Added $Added"
        } catch {
            Write-Host "Failed to add computer with name $CpuName and MAC $MAC"
            $Skipped++
        }
    }
    Write-Host "Added $Added computers, skipped $Skipped"
    Write-Host "Script completed at $(Get-Date -Format 'HH:mm:ss dd.MM.yyyy')"
    

    When you no longer need to import just leave a field empty and it will cut you out and end the script.

  • Pre-requisites to run powershell against your SCCM

    Pre-requisites to run powershell against your SCCM

    Start by connecting your site:

    Start Powershell ISE to see the script that is needed to connect to your SCCM instance. Script will be auto-generated like the below screenshot shows:

    When you run the script. You might get a popup saying the following:

    This allows you to do much more with SCCM. This gives you a base script for your own environment for your scripts. So gather the needed lines from the generated script and add more after the pre-requisite steps.