Tag: Intune

All things related to Intune

  • Using SCCM database and powershell to register devices to Intune – part 2

    Using SCCM database and powershell to register devices to Intune – part 2

    Have you ever tried to manage computer imports to Intune one by one. This happened for me and thus I had to make a new approach as I wasn’t sure how to do it so the client would feel that the solution would be easy. Hence powershell and sql script.

    Part 1 was about a single computer and part 2 is about sccm collection

    # Modify these values
    $dataSource = "SCCM"
    $database = "CM_DEV"
    $csvFolderPath = "$env:USERPROFILE\Desktop\"
    # Autopilot Enrollment Profiles Group Tags
    $gt1 = "GroupTag 1"
    $gt2 = "Autopilot test"
    $gt3 = "AAD"
    
    Add-Type -AssemblyName PresentationFramework
    
    [xml]$xaml = @"
    <Window xmlns="http://schemas.microsoft.com/winfx/2006/xaml/presentation"
            xmlns:x="http://schemas.microsoft.com/winfx/2006/xaml"
            Title="Autopilot Configuration" Height="200" Width="450" Background="#f0f0f0">
        <Grid>
            <Grid.RowDefinitions>
                <RowDefinition Height="Auto"/>
                <RowDefinition Height="Auto"/>
                <RowDefinition Height="Auto"/>
                <RowDefinition Height="Auto"/>
                <RowDefinition Height="*"/>
            </Grid.RowDefinitions>
            <Grid.ColumnDefinitions>
                <ColumnDefinition Width="Auto"/>
                <ColumnDefinition Width="*"/>
            </Grid.ColumnDefinitions>
    
            <!-- Collection ID Input -->
            <Label Content="Collection ID:" Grid.Row="0" Grid.Column="0" Margin="10" VerticalAlignment="Center"/>
            <TextBox Name="CollectionID" Grid.Row="0" Grid.Column="1" Margin="10" Width="250"/>
    
            <!-- Group Tag Selection -->
            <Label Content="Group Tag:" Grid.Row="1" Grid.Column="0" Margin="10" VerticalAlignment="Center"/>
            <ComboBox Name="GroupTagDropdown" Grid.Row="1" Grid.Column="1" Margin="10" Width="250">
                <ComboBoxItem Content="$gt1"/>
                <ComboBoxItem Content="$gt2"/>
                <ComboBoxItem Content="$gt3"/>
            </ComboBox>
    
            <!-- Submit Button -->
            <Button Name="Submit" Content="Query &amp; Export" Grid.Row="2" Grid.ColumnSpan="2" Margin="10" Width="150" 
                    HorizontalAlignment="Center" Background="#0078d7" Foreground="White"/>
        </Grid>
    </Window>
    "@
    
    $reader = (New-Object System.Xml.XmlNodeReader $xaml)
    $window = [Windows.Markup.XamlReader]::Load($reader)
    $submitButton = $window.FindName("Submit")
    $collectionIDBox = $window.FindName("CollectionID")
    $groupTagDropdown = $window.FindName("GroupTagDropdown")
    $exportPathText = $window.FindName("ExportPathText")
    
    $submitButton.Add_Click({
        $collectionID = $collectionIDBox.Text.Trim()
        $selectedTag = $groupTagDropdown.SelectedItem.Content
    
        if ([string]::IsNullOrWhiteSpace($collectionID)) {
            [System.Windows.MessageBox]::Show("Please enter a valid Collection ID.")
            return
        }
    
        $connectionString = "Server=$dataSource;Database=$database;Integrated Security=SSPI;"
    
        try {
            Write-Host "Connecting to '$database' on '$dataSource'"
            $connection = New-Object System.Data.SqlClient.SqlConnection
            $connection.ConnectionString = $connectionString
            $connection.Open()
            $queryCollectionName = @"
            SELECT Name FROM v_Collection WHERE CollectionID = '$collectionID'
    "@
            $cmdCollectionName = $connection.CreateCommand()
            $cmdCollectionName.CommandText = $queryCollectionName
            $collectionName = $cmdCollectionName.ExecuteScalar()
    
            if (-not $collectionName) {
                [System.Windows.MessageBox]::Show("Invalid Collection ID. No collection found.")
                return
            }
    
            Write-Host "Collection Name: $collectionName"
    
            # Query devices in the collection
            $query = @"
            SELECT 
                bios.SerialNumber0 AS 'Device Serial Number',
                os.SerialNumber0 AS 'Windows Product ID',
                mdm.DeviceHardwareData0 AS 'Hardware Hash'
            FROM v_GS_PC_BIOS bios
            INNER JOIN v_GS_OPERATING_SYSTEM os ON bios.ResourceID = os.ResourceID
            INNER JOIN v_GS_MDM_DEVDETAIL_EXT01 mdm ON os.ResourceID = mdm.ResourceID
            INNER JOIN v_R_System sys ON mdm.ResourceID = sys.ResourceID
            INNER JOIN v_GS_COMPUTER_SYSTEM cpu ON mdm.ResourceID = cpu.ResourceID
            INNER JOIN v_FullCollectionMembership col ON cpu.ResourceID = col.ResourceID
            WHERE col.CollectionID = '$collectionID'
    "@
    
            $command = $connection.CreateCommand()
            $command.CommandText = $query
            $result = $command.ExecuteReader()
            $table = New-Object "System.Data.DataTable"
            $table.Load($result)
    
            $count = $table.Rows.Count
    
            if ($count -gt 0) {
                $csvFilePath = "$csvFolderPath$collectionName.csv"
                $table.Columns.Add("Group Tag", [string])
                foreach ($row in $table.Rows) {
                    $row["Group Tag"] = $selectedTag
                }
                $table | Export-Csv -Path $csvFilePath -NoTypeInformation -Encoding UTF8
                [System.Windows.MessageBox]::Show("Query executed successfully.`nFound $count records.`nResults saved to: $csvFilePath")
                $exportPathText.Text = "Export: $csvFilePath"
            } else {
                [System.Windows.MessageBox]::Show("No records found.")
            }
            $connection.Close()
            $window.Dispatcher.Invoke([System.Windows.Threading.DispatcherPriority]::Normal, [action]{
                $window.Close()
            })
        } catch {
            [System.Windows.MessageBox]::Show("An error occurred: $($_.Exception.Message)")
        }
    })
    
    $window.ShowDialog()


    So how does this look?

    You need to be able to find your collection from SCCM that you wish to export:

    This will do then the collection named .csv file and include the hash values.

    After being run you should be able to import your collection mass to Intune with group tag intact.

  • Using SCCM database and powershell to register devices to Intune – part 1

    Using SCCM database and powershell to register devices to Intune – part 1

    Have you ever tried to manage computer imports to Intune one by one. This happened for me and thus I had to make a new approach as I wasn’t sure how to do it so the client would feel that the solution would be easy. Hence powershell and sql script.

    For me I could only think of SQL query as the base on how to do this task. So I made an SQL query that would allow me to do this. Then started working on the powershell script that would allow me to use the SQL query that I wanted to use. So the results are like so:

    # Modify these values to connect your SCCM server
    $dataSource = "SCCM"
    $database = "CM_DEV"
    $csvPath = "$env:USERPROFILE\Desktop\Autopilot_Results.csv"
    
    # Autopilot Enrollment  Group Tag HARD CODED VALUES!
    $gt1 = "GroupTag 1"
    $gt2 = "Autopilot test"
    $gt3 = "AAD"
    
    Add-Type -AssemblyName PresentationFramework
    
    [xml]$xaml = @"
    <Window xmlns="http://schemas.microsoft.com/winfx/2006/xaml/presentation"
            xmlns:x="http://schemas.microsoft.com/winfx/2006/xaml"
            Title="Autopilot Configuration" Height="280" Width="400" Background="#f0f0f0">
        <Grid>
            <Grid.RowDefinitions>
                <RowDefinition Height="Auto"/>
                <RowDefinition Height="Auto"/>
                <RowDefinition Height="Auto"/>
                <RowDefinition Height="Auto"/>
                <RowDefinition Height="*"/>
            </Grid.RowDefinitions>
            <Grid.ColumnDefinitions>
                <ColumnDefinition Width="Auto"/>
                <ColumnDefinition Width="*"/>
            </Grid.ColumnDefinitions>
    
            <Label Content="Computer Name:" Grid.Row="0" Grid.Column="0" Margin="10" VerticalAlignment="Center"/>
            <TextBox Name="ComputerName" Grid.Row="0" Grid.Column="1" Margin="10" Width="250"/>
    
            <Label Content="Autopilot Group Tag:" Grid.Row="1" Grid.Column="0" Margin="10" VerticalAlignment="Center"/>
            <ComboBox Name="GroupTag" Grid.Row="1" Grid.Column="1" Margin="10" Width="250">
                <ComboBoxItem Content="$gt1"/>
                <ComboBoxItem Content="$gt2"/>
                <ComboBoxItem Content="$gt3"/>
            </ComboBox>
    
            <Button Name="Submit" Content="Submit" Grid.Row="2" Grid.ColumnSpan="2" Margin="10" Width="150" HorizontalAlignment="Center" Background="#0078d7" Foreground="White"/>
    
            <!-- New TextBlock to Display CSV Export Path -->
            <TextBlock Name="ExportPathText" Grid.Row="3" Grid.ColumnSpan="2" Margin="10" Foreground="Gray" HorizontalAlignment="Center"/>
        </Grid>
    </Window>
    "@
    $reader = (New-Object System.Xml.XmlNodeReader $xaml)
    $window = [Windows.Markup.XamlReader]::Load($reader)
    $submitButton = $window.FindName("Submit")
    $computerNameBox = $window.FindName("ComputerName")
    $groupTagBox = $window.FindName("GroupTag")
    $exportPathText = $window.FindName("ExportPathText")
    $exportPathText.Text = "Export: $csvPath"
    
    $submitButton.Add_Click({
        $computerName = $computerNameBox.Text
        $groupTag = $groupTagBox.SelectedItem.Content
    
        # Validate inputs
        if ([string]::IsNullOrWhiteSpace($computerName) -or [string]::IsNullOrWhiteSpace($groupTag)) {
            [System.Windows.MessageBox]::Show("Please enter a Computer Name and select a Group Tag.")
            return
        }
    
        $connectionString = "Server=$dataSource;Database=$database;Integrated Security=SSPI;"
    
        try {
            Write-Host "Opening a connection to '$database' on '$dataSource'"
            $connection = New-Object System.Data.SqlClient.SqlConnection
            $connection.ConnectionString = $connectionString
            $connection.Open()
    
            # Running query
            Write-Host "Running query for ComputerName: $computerName and GroupTag: $groupTag"
    
            $query = @"
            SELECT 
                bios.SerialNumber0 AS 'Device Serial Number',
                os.SerialNumber0 AS 'Windows Product ID',
                mdm.DeviceHardwareData0 AS 'Hardware Hash'
            FROM v_GS_PC_BIOS bios
            INNER JOIN v_GS_OPERATING_SYSTEM os ON bios.ResourceID = os.ResourceID
            INNER JOIN v_GS_MDM_DEVDETAIL_EXT01 mdm ON os.ResourceID = mdm.ResourceID
            INNER JOIN v_R_System sys ON mdm.ResourceID = sys.ResourceID
            INNER JOIN v_GS_COMPUTER_SYSTEM cpu ON mdm.ResourceID = cpu.ResourceID
            WHERE cpu.Name0 LIKE @ComputerName
    "@
            $command = $connection.CreateCommand()
            $command.CommandText = $query
            $command.Parameters.Add((New-Object Data.SqlClient.SqlParameter("@ComputerName", "%$computerName%")))
            $result = $command.ExecuteReader()
            $table = New-Object "System.Data.DataTable"
            $table.Load($result)
    
            $count = $table.Rows.Count
    
            if ($count -gt 0) {
                $table.Columns.Add("Group Tag") | Out-Null
                foreach ($row in $table.Rows) {
                    $row["Group Tag"] = $groupTag
                }
    
                # Export to CSV
                $table | Export-Csv -Path $csvPath -NoTypeInformation -Encoding UTF8
    
                [System.Windows.MessageBox]::Show("Query executed successfully.`nFound $count records.`nResults saved to: $csvPath")
            } else {
                [System.Windows.MessageBox]::Show("No records found.")
            }
            $connection.Close()
            $window.Dispatcher.Invoke([System.Windows.Threading.DispatcherPriority]::Normal, [action]{
                $window.Close()
            })
        } catch {
            [System.Windows.MessageBox]::Show("An error occurred: $($_.Exception.Message)")
        }
    })
    $window.ShowDialog()
    

    So how does this look?

    You need to be able to find your computer from the database:

    After being run. It will then make a single computer file that can be imported to Intune with group tag intact.

    This is not currently being developed into a multi computer import but it should be quite a simple change to do like sccm collection id query and get the results from there then. Well I found the time to do it, here is part 2

  • Patch my PC – without publishing service

    Patch my PC – without publishing service

    So if you are using PMPC you do know its really good product by now. But what if you don’t have servers anymore to publish your products?

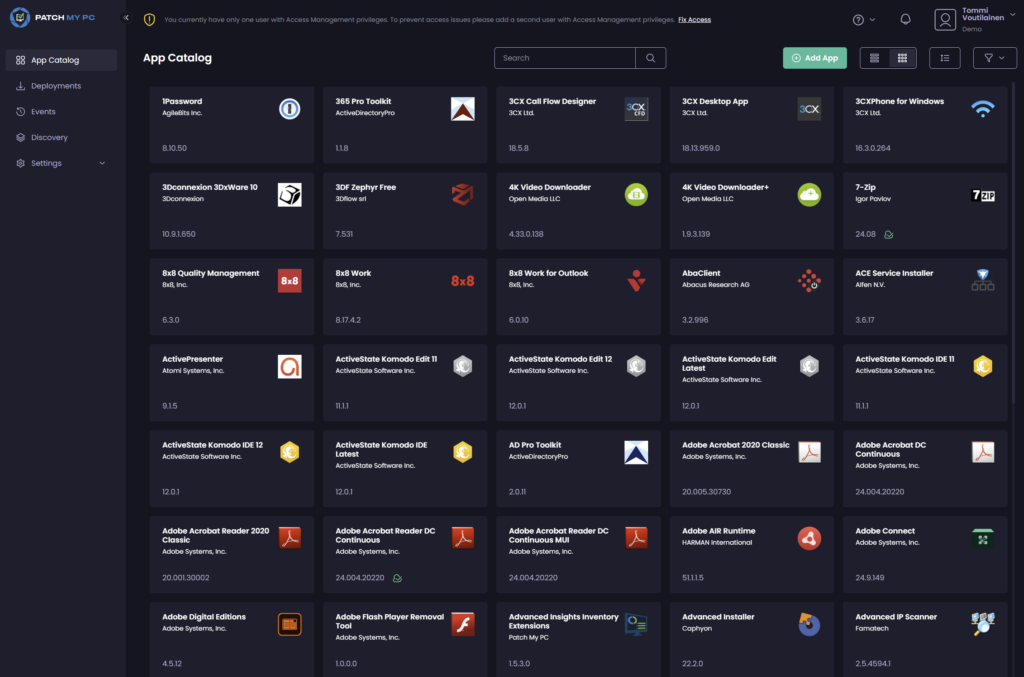
    Patch My PC addressed this problem by developing online portal (https://portal.patchmypc.com/). Its not at all perfect at the moment. Its still being developed. But this is still a quick browse through:

    This is the basic example of what it looks like.

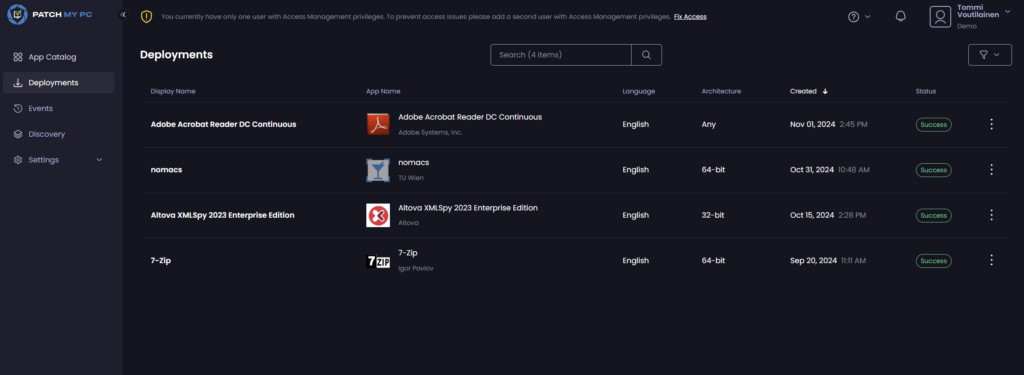
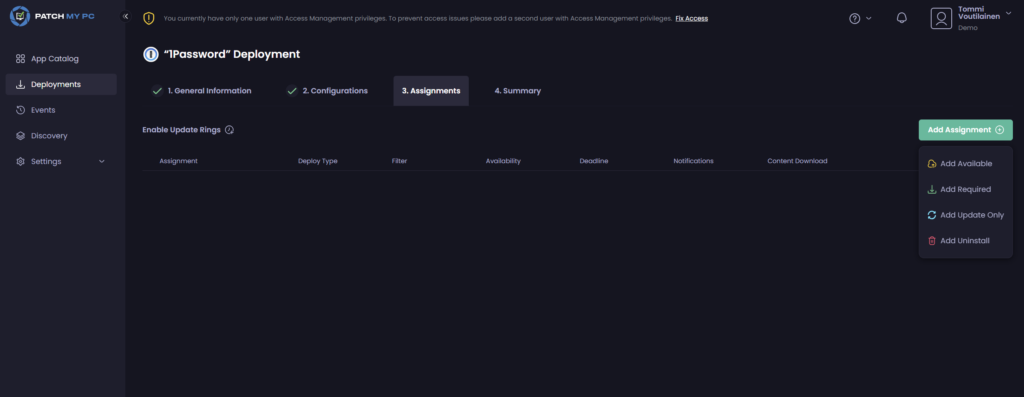
    Deployments can be made using the portal as well as updates and uninstalls.

    This is really simple and well thought out. More features are incoming but I’d venture a guess that this will be the use case in the future.

    If you are interested in more detailed please use the official site: Patch My PC Cloud | Getting Started

    The above has also guides on how to onboard to your cloud with patch my pc portal. There is no point of me taking the steps once again, as PMPC does documentation better than I do. My main goal was just to basically promote this as the current users of PMPC doesn’t even know they currently has the option to use this even. So it doesn’t hurt to acknowledge there is other ways to use PMPC product as well.

  • Windows 11 and Multi app kiosks

    Windows 11 and Multi app kiosks

    Lets be clear. There are easier ways of doing this but I am not looking for a cut corners solution. I have made a multi app based kiosk with powershell scripts as Windows 11 and multi app kiosks are not really thought through.

    Win11 leaves too much wiggle room for kioskuser so I make the assigned access by hand. And oh boy what problems does this make…

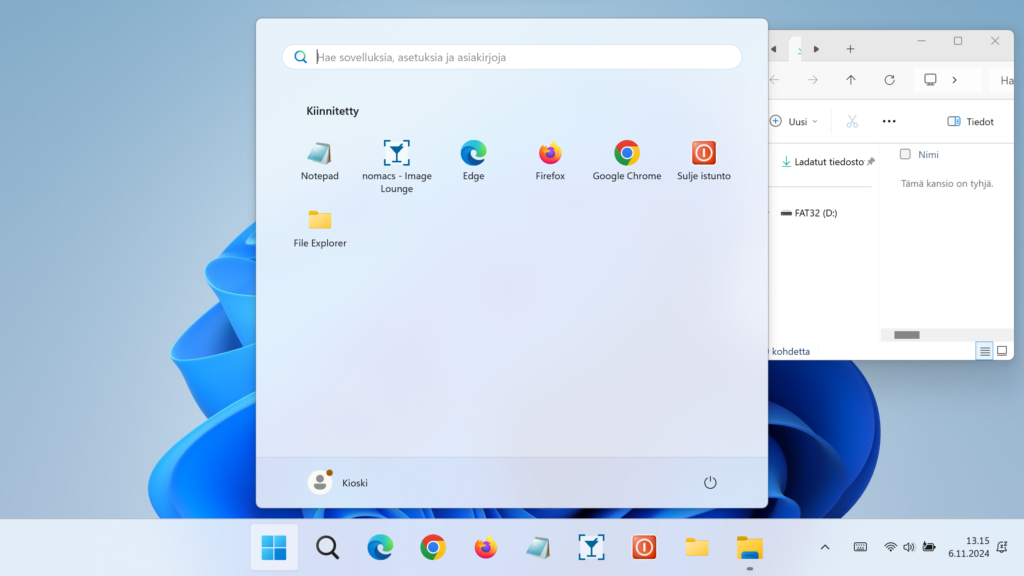
    So in short I make a kiosk that has basics in place. Lets say browsers, Nomacs – Image Lounge, shutdown and explorer.

    Setup is quite basic. So last month Microsoft did something to Windows 11 and when running this idea of kiosks then you’ll lose ability to see desktop after 2024-10-cumulative update. Have not seen why this is but… It is what it is.

    So now you have to make your own task bar icons so you have start menu and task bar to allow your kioskuser to fuction well. I would rather had desktop but M$ doesn’t agree.

    Limiting Win11 kiosk experience

    So now we have a bases setup for you if you’d choose this way. There is much uncertainty based on this so I wouldn’t recommend this unless you wanted more security.

    Create an Assigned Access configuration file | Microsoft Learn

    So my idea is to use xml and have kioskuser0 be added to guest group. This will strict down access quite a bit and user will only allowed to use locally installed application – no UWP apps available.

    So all needs to be setup in xml that then is imported to powershell and I use app install to use it in Intune. Powershell has scheduled tasks so there will be nothing left after the session is booted. All downloads will be removed, on log in and shutdown.

    
    # Specify the username of the user you want to add to the Guests group
    $username = "KioskUser0"
    
    # Check if the user exists
    $user = Get-LocalUser -Name $username -ErrorAction SilentlyContinue
    if ($user) {
        # Check if the Guests group exists
        if (Get-LocalGroup -SID "S-1-5-32-546" -ErrorAction SilentlyContinue) {
            Add-LocalGroupMember -SID "S-1-5-32-546" -Member $username
            Write-Host "User '$username' successfully added to the 'Guests' group."
            Write-Host "Password for '$username' set to never expire."
        } else {
            Write-Host "Error: The 'Guests' group does not exist."
        }
    } else {
        Write-Host "Error: User '$username' does not exist."
    }
    # Set password to never expire
    $user | Set-LocalUser -PasswordNeverExpires $true

    So for me this is a key feature on this. You really do need to do this when using Win11. Well this i my opinion of course.

    I don’t want to bore you with massive texts so lets put the key piece in here to emphasize what assigned was in this example:

            <AllowedApps> 
              <App AppUserModelId="windows.immersivecontrolpanel_cw5n1h2txyewy!microsoft.windows.immersivecontrolpanel" />
    	      <App AppUserModelId="Microsoft.WindowsNotepad_8wekyb3d8bbwe!App" />
    		  <App AppUserModelId="Microsoft.Windows.Explorer!App" />
              <App DesktopAppPath="%windir%\explorer.exe" />
              <App DesktopAppPath="%ProgramFiles(x86)%\Microsoft\Edge\Application\msedge.exe" />
              <App DesktopAppPath="%Programfiles%\Adobe\Acrobat DC\Acrobat\Acrobat.exe" />
              <App DesktopAppPath="%Programfiles%\Google\Chrome\Application\chrome.exe" />
    		  <App DesktopAppPath="%windir%\system32\shutdown.exe" />
              <App DesktopAppPath="%windir%\system32\Notepad.exe" />
              <App DesktopAppPath="%Programfiles%\nomacs - Image Lounge\bin\nomacs.exe" />
            </AllowedApps> 
          </AllAppsList> 
            <v2:FileExplorerNamespaceRestrictions>
            <v2:AllowedNamespace Name="Downloads"/>
            <v3:AllowRemovableDrives/>
          </v2:FileExplorerNamespaceRestrictions>
          <win11:StartPins>
            <![CDATA[{
              "pinnedList":[
                {"desktopAppLink": "%ALLUSERSPROFILE%\\Microsoft\\Windows\\Start Menu\\Programs\\Kiosk\\Notepad.lnk"},
                {"desktopAppLink": "%ALLUSERSPROFILE%\\Microsoft\\Windows\\Start Menu\\Programs\\nomacs - Image Lounge.lnk"},
    			{"desktopAppLink": "%ALLUSERSPROFILE%\\Microsoft\\Windows\\Start Menu\\Programs\\Adobe Acrobat.lnk"},
                {"desktopAppLink": "%ALLUSERSPROFILE%\\Microsoft\\Windows\\Start Menu\\Programs\\Microsoft Edge.lnk"},
                {"desktopAppLink": "%ALLUSERSPROFILE%\\Microsoft\\Windows\\Start Menu\\Programs\\Firefox.lnk"},
                {"desktopAppLink": "%ALLUSERSPROFILE%\\Microsoft\\Windows\\Start Menu\\Programs\\Google Chrome.lnk"}    
    			{"desktopAppLink": "%ALLUSERSPROFILE%\\Microsoft\\Windows\\Start Menu\\Programs\\Kiosk\\sulje istunto.lnk"}  
    			{"desktopAppLink": "%ALLUSERSPROFILE%\\Microsoft\\Windows\\Start Menu\\Programs\\Kiosk\\File Explorer.lnk"}  
              ]
            }]]>
          </win11:StartPins>
          <Taskbar ShowTaskbar="true"/>
          <win11:TaskbarLayout>
      <![CDATA[
        <LayoutModificationTemplate 
        xmlns:defaultlayout="http://schemas.microsoft.com/Start/2014/FullDefaultLayout" 
        xmlns:start="http://schemas.microsoft.com/Start/2014/StartLayout" 
        xmlns:taskbar="http://schemas.microsoft.com/Start/2014/TaskbarLayout" 
        Version="1" xmlns="http://schemas.microsoft.com/Start/2014/LayoutModification">
          <CustomTaskbarLayoutCollection PinListPlacement="Replace">
            <defaultlayout:TaskbarLayout>
              <taskbar:TaskbarPinList>
                <taskbar:DesktopApp DesktopApplicationLinkPath="%ALLUSERSPROFILE%\Microsoft\Windows\Start Menu\Programs\Microsoft Edge.lnk"/>
    			<taskbar:DesktopApp DesktopApplicationLinkPath="%ALLUSERSPROFILE%\Microsoft\Windows\Start Menu\Programs\Google Chrome.lnk"/>
    			<taskbar:DesktopApp DesktopApplicationLinkPath="%ALLUSERSPROFILE%\Microsoft\Windows\Start Menu\Programs\Firefox.lnk"/>
    			<taskbar:DesktopApp DesktopApplicationLinkPath="%ALLUSERSPROFILE%\Microsoft\Windows\Start Menu\Programs\Kiosk\Notepad.lnk"/>
    			<taskbar:DesktopApp DesktopApplicationLinkPath="%ALLUSERSPROFILE%\Microsoft\Windows\Start Menu\Programs\nomacs - Image Lounge.lnk"/>
    			<taskbar:DesktopApp DesktopApplicationLinkPath="%ALLUSERSPROFILE%\Microsoft\Windows\Start Menu\Programs\Adobe Acrobat.lnk"/>
    			<taskbar:DesktopApp DesktopApplicationLinkPath="%ALLUSERSPROFILE%\Microsoft\Windows\Start Menu\Programs\Kiosk\sulje istunto.lnk"/>
    			<taskbar:DesktopApp DesktopApplicationLinkPath="%ALLUSERSPROFILE%\Microsoft\Windows\Start Menu\Programs\Kiosk\File Explorer.lnk"/>
              </taskbar:TaskbarPinList>
            </defaultlayout:TaskbarLayout>
          </CustomTaskbarLayoutCollection>
        </LayoutModificationTemplate>

    This is NOT the whole assigned access. This is only an example that has the required parts. So please don’t use this as “whole xml” since its not. You need to put your own layout but might use this as an example.

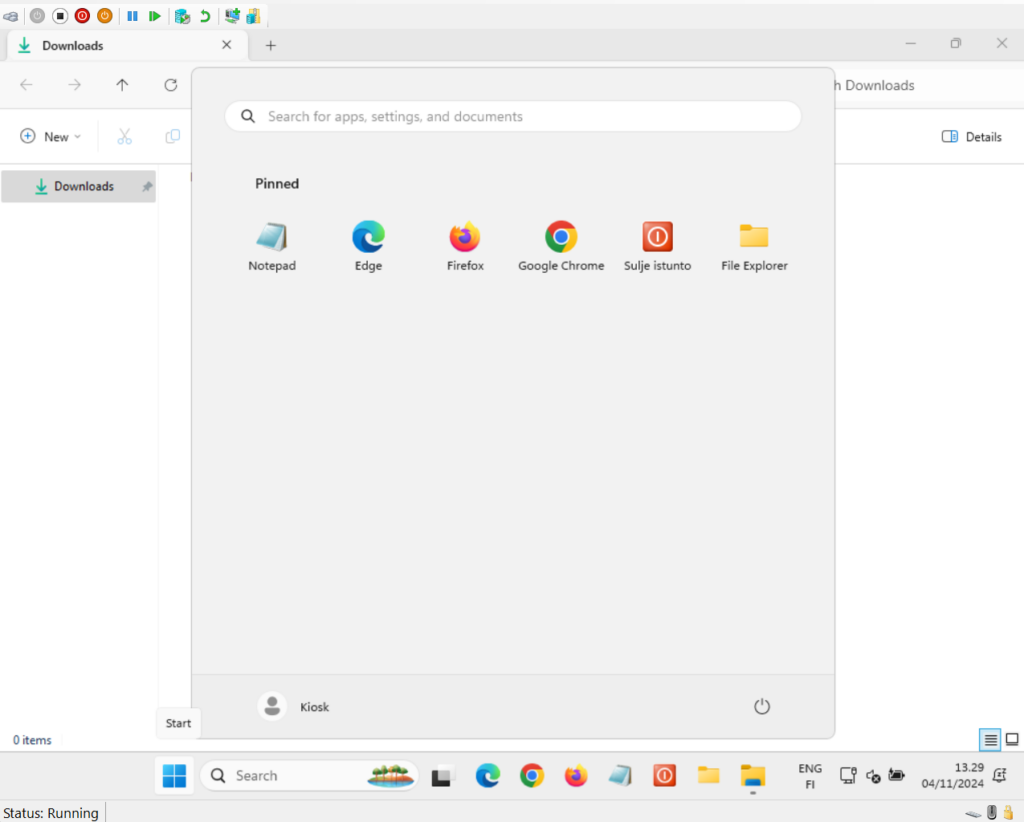
    How Windows 11 kiosk looks

    Virtual machine will get desktop so bare this in mind. As this is a virtual machine, it will actually see the public desktop icons. This is why there is a full screen explorer open, so you will not have false sense of hope that you can use desktopicons with Win11 kiosk. This is not something you will experience with proper computer:

    There will be the option to use removeable drives but with VM being the test subject there is none available. It works tho.

    Updated: This is an example of a real computer screen. Finnish OS that has been built with Windows 11 kiosk with limited access to only Downloads and removable drives. All the icons that should be in users desktop are gone. There are all icons in available in the public desktop, but kioskuser0 will not see these after last CU update and running the autopilot after these updates.